

Overview
OnSpace Cloud supports Sign in with Google, allowing users to create an account or sign in with their existing Google Account. Google sign-in is configured in your project’s Cloud authentication settings. To complete the setup, you need to create a Web application OAuth client in Google Cloud and add the callback URL provided by OnSpace. You will need:- A Google Cloud project
- A configured Google Auth Platform application
- A Web application OAuth client
- A Google Client ID
- A Google Client Secret
- The Callback URL provided by OnSpace Cloud
Before You Start
Make sure you have:- Access to the Google Cloud Console
- Permission to create or manage OAuth credentials in the selected Google Cloud project
- Access to your project in OnSpace
- The app name, support email, and developer contact information you want users to see during Google authorization
Step 1: Open the Google sign-in settings
Open your project in OnSpace and go to: Cloud → Users → Auth Under Sign in methods, locate Google, then click it to open the configuration page.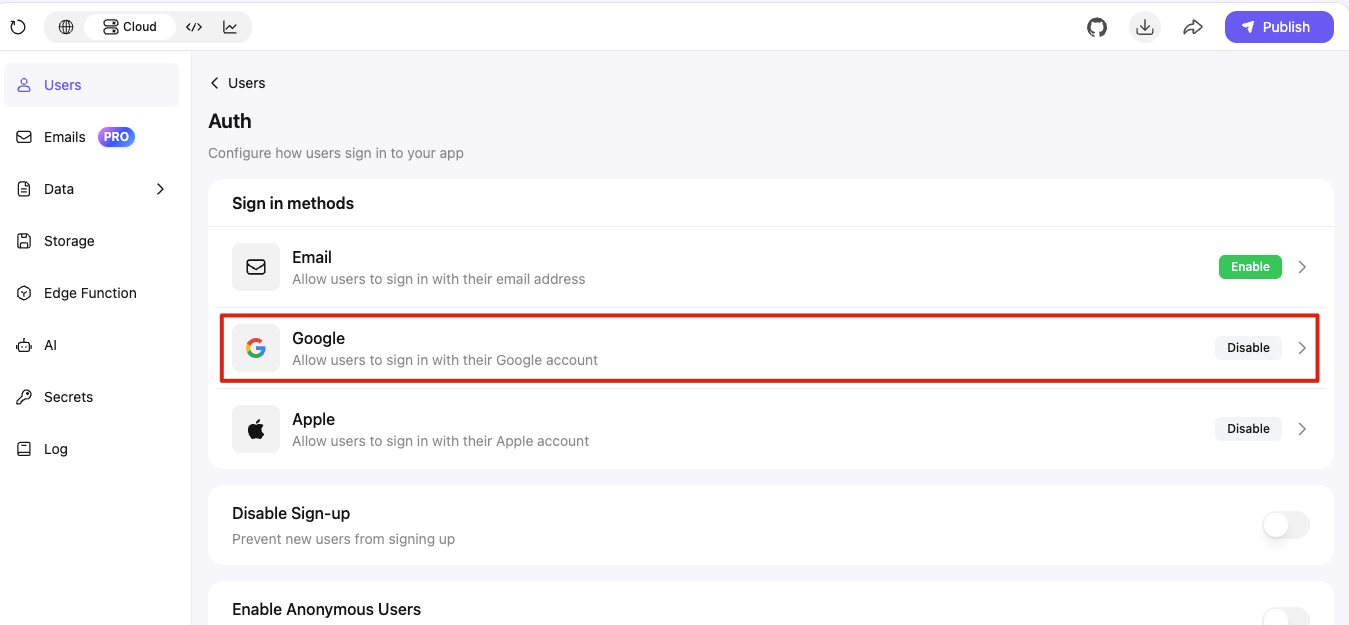
Google sign-in entry: Open Cloud → Users → Auth, then select Google under Sign in methods.
Step 2: Review the required OnSpace settings
The Google Settings page contains the following fields:- Enable Google Sign-in
- Google Client ID
- Google Client Secret
- Callback URL
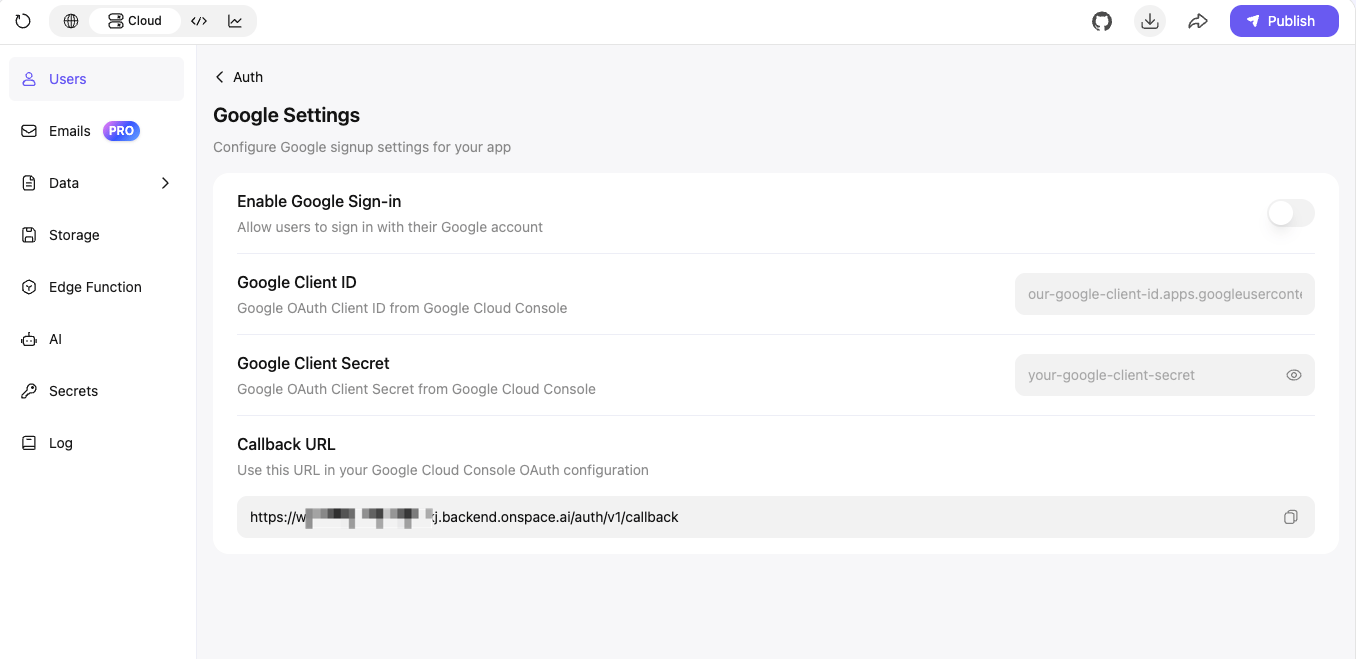
Google settings: Copy the Callback URL shown on this page. After creating your Google OAuth client, return here to enter the Client ID and Client Secret.
Step 3: Create or select a Google Cloud project
Open the Google Cloud Console and select an existing project, or create a new project for your app. Use a project that you control and plan to keep active for the lifetime of your app.Step 4: Configure the Google Auth Platform application
In Google Cloud Console, open Google Auth Platform. If this is the first OAuth client in the project, click Get started and complete the application setup. Provide the required information, including:- App name
- User support email
- Audience
- Developer contact email
Step 5: Create a Web application OAuth client
In Google Auth Platform, open: Clients → Create client Select: Web application Enter a recognizable name, such as:Step 6: Add the OnSpace Callback URL
Return to the Google Settings page in OnSpace Cloud and copy the value shown under: Callback URL It will look similar to:https://is included- There are no spaces
- Capitalization has not changed
- No characters are missing
- No extra trailing slash has been added
Step 7: Copy the Google Client ID and Client Secret
After creating the OAuth client, Google provides:- Client ID
- Client Secret
Important: For newly created OAuth clients, the full Client Secret may only be visible or downloadable when it is created. If you lose it, create or rotate the client secret in Google Cloud.
Step 8: Complete the configuration in OnSpace Cloud
Return to: Cloud → Users → Auth → Google Enter the values from Google Cloud:Google Client ID
Paste the OAuth Client ID created for the Web application. It normally ends with:Google Client Secret
Paste the corresponding OAuth Client Secret. Use the eye icon to review the value when needed.Enable Google Sign-in
After confirming that the Client ID, Client Secret, and Callback URL configuration are correct, turn on: Enable Google Sign-in Save the configuration if the page displays a save action.Step 9: Add Google sign-in to your app
Make sure your app’s login or sign-up page includes a Continue with Google or Sign in with Google button. You can ask OnSpace AI to add it with a prompt such as:Step 10: Test Google sign-in
Test the complete sign-in flow in a published website or installed app build. Confirm that:- The Google sign-in button is visible
- Selecting it opens Google’s authorization flow
- The correct app name is displayed
- A new user can create an account
- The user returns to the app after authorization
- Returning users can sign in with the same Google Account
- A user record appears in Cloud → Users
Common Issues
redirect_uri_mismatch
The Callback URL sent during login does not exactly match an Authorized redirect URI in Google Cloud.
Copy the URL from OnSpace again and check:
- Scheme (
https://) - Capitalization
- Path
- Trailing slash
- Extra spaces
invalid_client
The Client ID or Client Secret is incorrect.
Confirm that:
- Both values come from the same OAuth client
- The OAuth client type is Web application
- The complete Client Secret was copied
- The secret has not been deleted or rotated
Access blocked or app not configured
Review the Google Auth Platform setup and confirm that:- App information is complete
- The audience is configured correctly
- Required contact information is present
- The OAuth client belongs to the correct Google Cloud project
Only selected accounts can sign in
Check the app’s Audience and publishing status. For public access, configure the app for an external audience and complete any production or verification steps requested by Google.Google sign-in works in testing but not after publishing
Confirm that the published app is using the same OnSpace project and callback URL that were configured in Google Cloud. Also verify that the Client ID and Client Secret in OnSpace were not replaced with credentials from another Google Cloud project.Security Notes
- Never expose the Google Client Secret in frontend code
- Do not publish the Client Secret in documentation, screenshots, repositories, or support messages
- Store a backup securely when the secret is created
- Rotate the secret immediately if it may have been exposed
- Remove unused OAuth clients and old secrets from Google Cloud
Configuration Checklist
Before testing, confirm that:- A Google Cloud project has been selected
- Google Auth Platform has been configured
- The audience is correct for the intended users
- A Web application OAuth client has been created
- The OnSpace Callback URL has been added under Authorized redirect URIs
- The Google Client ID has been entered in OnSpace
- The Google Client Secret has been entered in OnSpace
- Enable Google Sign-in has been turned on
- A Google sign-in button exists in the app
- The full sign-in flow has been tested