> ## Documentation Index
> Fetch the complete documentation index at: https://docs.onspace.ai/llms.txt
> Use this file to discover all available pages before exploring further.
# GitHub Integration
> Sync your OnSpace AI project with GitHub for full code ownership, version control, and deployment flexibility. Never get locked into a single platform - your code, your choice.
## Why You Need GitHub Integration
As your OnSpace AI project grows from a simple prototype to a real application, you'll face important questions: What if something breaks and you need to roll back? How do you collaborate with developers? What if you want to deploy outside of OnSpace AI? GitHub integration solves these challenges by ensuring you have full version control, collaboration tools, and code portability throughout your app's lifecycle.
### TL;DR:
* **The Problem:** Without proper version control, you risk losing work, can't easily collaborate with developers, and might get locked into a single platform.
* **The Solution:** By linking your project to GitHub, every change in your OnSpace AI app is backed up in a Git repository in real time.
* **What You Get:** Complete code history, ability to collaborate with developers in familiar workflows, and freedom to host or deploy your app anywhere.
* **Git** is the version control system that tracks changes in your code.
* **GitHub** is the industry-standard platform for hosting Git repositories, making it essential for both solo builders and teams.
## Key Benefits Overview
GitHub integration transforms your OnSpace AI project from an isolated prototype into a professional, scalable application. Here's what you get:
* **Complete Code Ownership**
Your project becomes a standard application codebase stored in your own GitHub repository. Whether it's a web app, mobile app, or full-stack solution – no proprietary formats, no platform dependencies – just clean, portable code you can take anywhere.
* **Automatic Version Control**
Every change you make is instantly committed with a full audit trail. Accidentally broke something? Roll back to any previous version in seconds. Need to see what changed last week? Complete history at your fingertips.
* **Professional Developer Workflows**
Developers can contribute using industry-standard GitHub practices – pull requests, code reviews, issue tracking. They work in their preferred IDEs while your changes sync seamlessly from OnSpace AI.
* **Deployment Freedom**
Deploy your web apps on Vercel, Netlify, or AWS. Publish mobile apps to App Store and Google Play. Host full-stack applications on any cloud platform. You're not tied to OnSpace AI's hosting – choose what works best for your use case and budget.
* **Bidirectional Sync**
Code changes flow both ways. Edit in OnSpace AI and see updates in GitHub instantly. Push changes from your IDE and watch them appear in OnSpace AI. Work however feels most productive.
* **Enterprise Integration**
Connect GitHub Actions for automated testing, building, and deployment pipelines. Integrate with your company's existing development workflow. Add security scanning, performance monitoring, or any tools your team already uses for web and mobile development.
## Getting Started
Setting up GitHub integration with your OnSpace AI project takes just a few minutes and ensures your code is backed up and version-controlled from day one.
### Prerequisites
Before you begin, you'll need:
* GitHub Account: Sign up for free at github.com if you don't have one
* OnSpace AI Project: An existing project in your OnSpace AI editor (or create a new one)
* Repository Permissions: Ability to create repositories in your GitHub account or organization
### Step-by-Step Setup
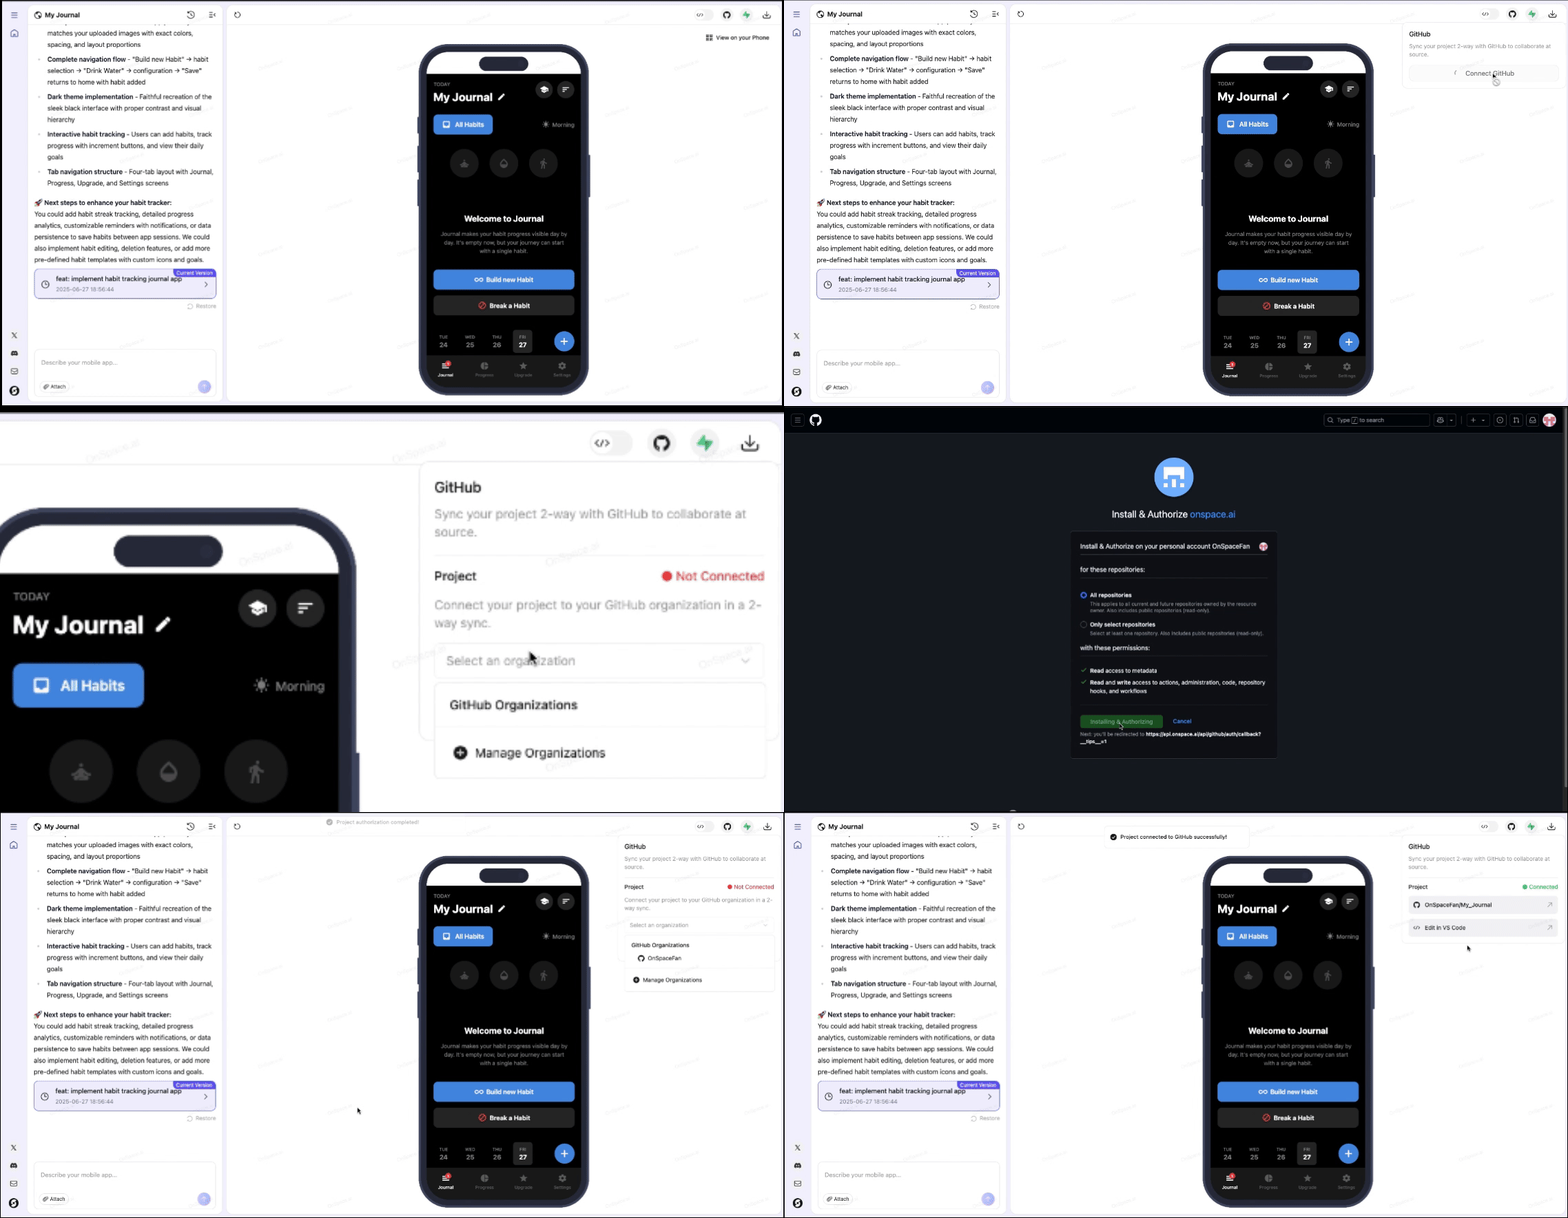 In your OnSpace AI editor, click the **GitHub icon** in the top-right corner, then select **Connect GitHub**.
 * You'll be redirected to GitHub's authorization page:
* **Select your GitHub account** to authorize OnSpace AI
* Click \*\*Continue \*\*to proceed to the permission screen
* Review the basic permissions OnSpace AI requests:
* Verify your GitHub identity
* Know which resources you can access
* Act on your behalf
* Click **Authorize onspace.ai** to grant initial permissions
You'll be returned to OnSpace AI:
* The GitHub integration panel will show "**Not Connected**" status
* **Select an organization**: Choose between your personal account or any organizations you belong to from the dropdown
After selecting your organization, you'll be redirected to GitHub again:
* Choose your repository access level:
* **All repositories**: Grants access to all current and future repositories (recommended for ease of use)
* **Only select repositories**: Choose specific repositories for OnSpace AI access
* Click**Install & Authorize** to install the GitHub app to your selected account/organization
Back in OnSpace AI:
* Select your preferred GitHub account/organization from the dropdown (if not already selected)
* Click **Connect Project** to create the repository and establish the connection
Once connected successfully:
* Status will change to **"Connected"** with a green indicator
* You'll see your repository path (e.g., `username/ProjectName`)
* An **"Edit in VS Code"** option becomes available
* Your project code is now synced to GitHub
### Repository Privacy
**Important**: Repositories created through OnSpace AI integration are **private by default**, ensuring your code remains secure and accessible only to you and invited collaborators.
### You're All Set!
From this point forward:
* Changes in OnSpace AI automatically commit to GitHub
* External changes pushed to GitHub sync back to OnSpace AI
* You have complete version history and professional backup
* Team collaboration through standard GitHub workflows is enabled
The connection is bidirectional and real-time, giving you the confidence that your work is always protected and professionally managed.
## Under the Hood: Git Sync
### The Technical Reality
OnSpace AI doesn't reinvent version control. Instead, it operates as a Git client that communicates directly with GitHub's API, making standard Git operations on your behalf. Here's exactly how it works.
### Real-Time Repository Operations
**When you edit in OnSpace AI**:
1. A commit is created with an auto-generated message describing the change
2. The commit is pushed directly to your GitHub repository's default branch via GitHub API
3. Your repository's commit history updates instantly
**When external changes occur**:
1. GitHub webhooks notify OnSpace AI of incoming commits
2. OnSpace AI pulls the latest changes from the default branch
3. The editor refreshes to reflect the new code state
4. File tree and code view update automatically
### Branch Strategy
**Default branch focus**: OnSpace AI tracks only your repository's default branch. This design choice:
* Simplifies the sync model for reliability
* Aligns with CI/CD best practices
* Prevents complex merge scenarios in the editor
**Feature branch workflow**: External commits to feature branches remain invisible until merged to the default branch.
* You'll be redirected to GitHub's authorization page:
* **Select your GitHub account** to authorize OnSpace AI
* Click \*\*Continue \*\*to proceed to the permission screen
* Review the basic permissions OnSpace AI requests:
* Verify your GitHub identity
* Know which resources you can access
* Act on your behalf
* Click **Authorize onspace.ai** to grant initial permissions
You'll be returned to OnSpace AI:
* The GitHub integration panel will show "**Not Connected**" status
* **Select an organization**: Choose between your personal account or any organizations you belong to from the dropdown
After selecting your organization, you'll be redirected to GitHub again:
* Choose your repository access level:
* **All repositories**: Grants access to all current and future repositories (recommended for ease of use)
* **Only select repositories**: Choose specific repositories for OnSpace AI access
* Click**Install & Authorize** to install the GitHub app to your selected account/organization
Back in OnSpace AI:
* Select your preferred GitHub account/organization from the dropdown (if not already selected)
* Click **Connect Project** to create the repository and establish the connection
Once connected successfully:
* Status will change to **"Connected"** with a green indicator
* You'll see your repository path (e.g., `username/ProjectName`)
* An **"Edit in VS Code"** option becomes available
* Your project code is now synced to GitHub
### Repository Privacy
**Important**: Repositories created through OnSpace AI integration are **private by default**, ensuring your code remains secure and accessible only to you and invited collaborators.
### You're All Set!
From this point forward:
* Changes in OnSpace AI automatically commit to GitHub
* External changes pushed to GitHub sync back to OnSpace AI
* You have complete version history and professional backup
* Team collaboration through standard GitHub workflows is enabled
The connection is bidirectional and real-time, giving you the confidence that your work is always protected and professionally managed.
## Under the Hood: Git Sync
### The Technical Reality
OnSpace AI doesn't reinvent version control. Instead, it operates as a Git client that communicates directly with GitHub's API, making standard Git operations on your behalf. Here's exactly how it works.
### Real-Time Repository Operations
**When you edit in OnSpace AI**:
1. A commit is created with an auto-generated message describing the change
2. The commit is pushed directly to your GitHub repository's default branch via GitHub API
3. Your repository's commit history updates instantly
**When external changes occur**:
1. GitHub webhooks notify OnSpace AI of incoming commits
2. OnSpace AI pulls the latest changes from the default branch
3. The editor refreshes to reflect the new code state
4. File tree and code view update automatically
### Branch Strategy
**Default branch focus**: OnSpace AI tracks only your repository's default branch. This design choice:
* Simplifies the sync model for reliability
* Aligns with CI/CD best practices
* Prevents complex merge scenarios in the editor
**Feature branch workflow**: External commits to feature branches remain invisible until merged to the default branch.