> ## Documentation Index
> Fetch the complete documentation index at: https://docs.onspace.ai/llms.txt
> Use this file to discover all available pages before exploring further.
# Configure-sign-in-with-apple
Learn how to enable and configure **Sign in with Apple** for your project in **OnSpace Cloud**.
## Overview
OnSpace Cloud supports **Sign in with Apple**, allowing users to sign in to your app or website with their Apple account.
Apple sign-in is disabled by default and must be enabled manually. To complete the setup, you will need credentials from your Apple Developer account, including:
* Client ID
* Client Secret (JWT)
* Private Key (`.p8` file)
* Key ID
* Team ID
* Redirect URL
## Before You Start
Make sure you have:
* An active Apple Developer account
* A configured Apple auth client in Apple Developer Console
* A valid Services ID or Bundle ID
* A Sign in with Apple private key (`.p8`)
* Access to your project in OnSpace Cloud
## Step 1: Open the Apple sign-in settings
In your project, go to:
**Cloud → Users → Auth**
Under **Sign in methods**, locate **Apple**, then click it to open the Apple settings page.
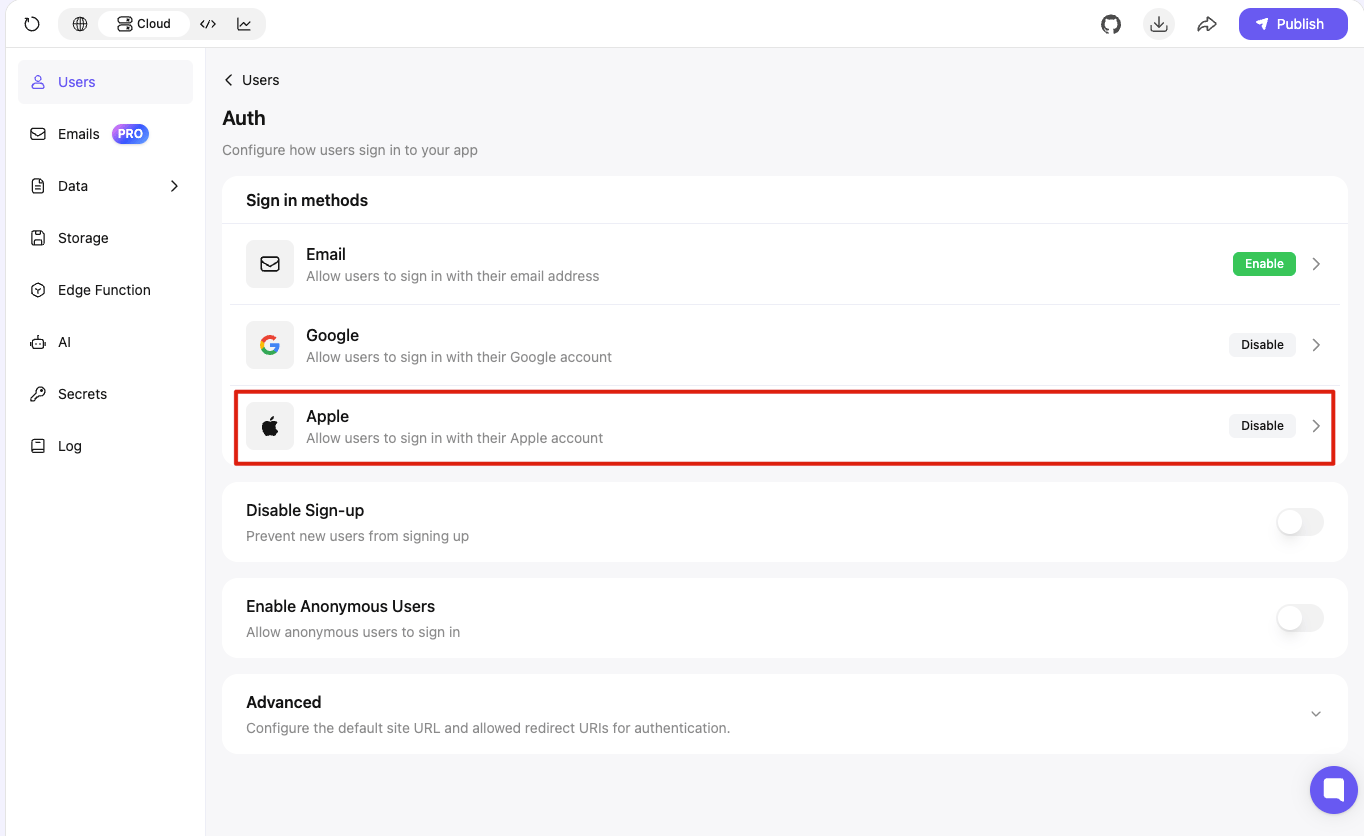 *Open **Cloud → Users → Auth**, then select **Apple** under Sign in methods.*
## Step 2: Enable Apple sign-in
On the **Apple settings** page, turn on **Enable Apple sign-in**.
Apple sign-in is disabled by default, so you must enable it manually before entering your credentials.
*Open **Cloud → Users → Auth**, then select **Apple** under Sign in methods.*
## Step 2: Enable Apple sign-in
On the **Apple settings** page, turn on **Enable Apple sign-in**.
Apple sign-in is disabled by default, so you must enable it manually before entering your credentials.
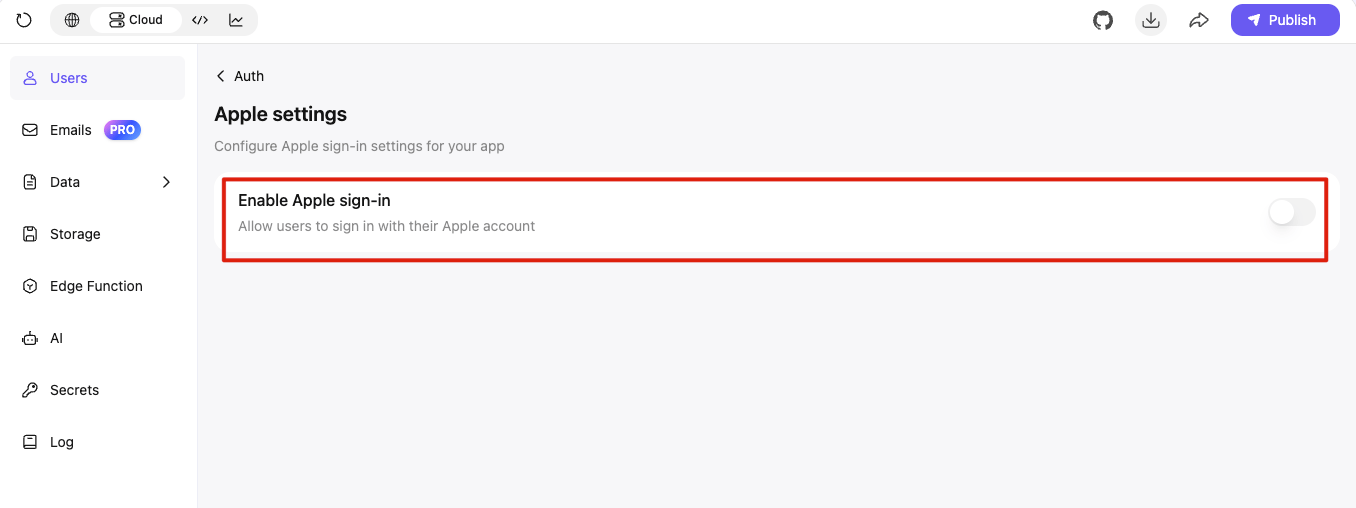 *Turn on the **Enable Apple sign-in** toggle.*
## Step 3: Choose your own credentials
After Apple sign-in is enabled, select **Your own credentials**.
This allows your project to use credentials from your own Apple Developer account.
You can complete the setup in either of these ways:
1. Paste an existing Client Secret (JWT).
2. Generate a new Client Secret (JWT) inside OnSpace Cloud using your `.p8` private key.
## Step 4: Enter the Client ID and Client Secret
Enter the following values:
### Client ID
Enter your Apple **Client ID**. This can be a **Services ID** or **Bundle ID** and usually uses a reverse-domain format.
Example:
```text theme={null}
com.example.app
```
### Client Secret (JWT)
Enter a valid Apple **Client Secret (JWT)**.
If you already have one, paste it into the field. Otherwise, expand **Generate secret** to create one inside OnSpace Cloud.
*Turn on the **Enable Apple sign-in** toggle.*
## Step 3: Choose your own credentials
After Apple sign-in is enabled, select **Your own credentials**.
This allows your project to use credentials from your own Apple Developer account.
You can complete the setup in either of these ways:
1. Paste an existing Client Secret (JWT).
2. Generate a new Client Secret (JWT) inside OnSpace Cloud using your `.p8` private key.
## Step 4: Enter the Client ID and Client Secret
Enter the following values:
### Client ID
Enter your Apple **Client ID**. This can be a **Services ID** or **Bundle ID** and usually uses a reverse-domain format.
Example:
```text theme={null}
com.example.app
```
### Client Secret (JWT)
Enter a valid Apple **Client Secret (JWT)**.
If you already have one, paste it into the field. Otherwise, expand **Generate secret** to create one inside OnSpace Cloud.
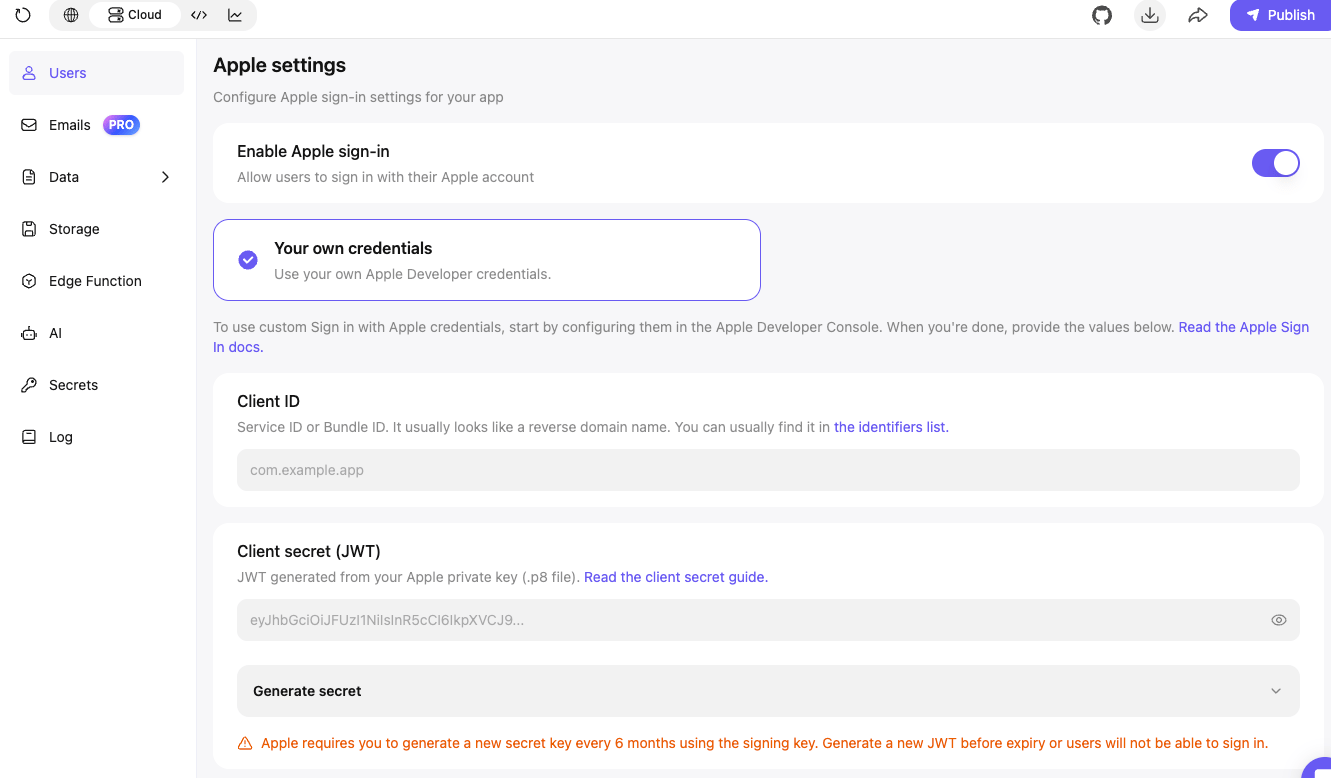 *Enter your Client ID and Client Secret, or expand **Generate secret** to create a new JWT.*
> **Important:** Apple requires a new client secret to be generated every 6 months using the signing key. Generate a new JWT before the current one expires, or users will no longer be able to sign in.
## Step 5: Generate a Client Secret in OnSpace Cloud
Expand **Generate secret**, then complete the following fields.
### Private Key (.p8 file)
Click **Upload .p8 file** and select the private key downloaded from Apple Developer Console.
The secret-generation tool runs on your device. Your Apple credentials stay private and are not sent to OnSpace servers.
### Key ID
Enter your Apple **Key ID**.
If the uploaded file uses Apple’s default filename format, such as `AuthKey_XXXXXXXXXX.p8`, the Key ID may be filled automatically. You can edit it when necessary.
Example:
```text theme={null}
XYZ123ABC4
```
### Client ID (Services ID)
Enter your Apple **Services ID**.
Example:
```text theme={null}
com.example.app.service
```
### Team ID
Enter the 10-character **Team ID** from your Apple Developer account.
Example:
```text theme={null}
ABCD1234EF
```
After all values are entered, click **Generate**. OnSpace Cloud will generate the JWT and insert it into the **Client Secret (JWT)** field.
*Enter your Client ID and Client Secret, or expand **Generate secret** to create a new JWT.*
> **Important:** Apple requires a new client secret to be generated every 6 months using the signing key. Generate a new JWT before the current one expires, or users will no longer be able to sign in.
## Step 5: Generate a Client Secret in OnSpace Cloud
Expand **Generate secret**, then complete the following fields.
### Private Key (.p8 file)
Click **Upload .p8 file** and select the private key downloaded from Apple Developer Console.
The secret-generation tool runs on your device. Your Apple credentials stay private and are not sent to OnSpace servers.
### Key ID
Enter your Apple **Key ID**.
If the uploaded file uses Apple’s default filename format, such as `AuthKey_XXXXXXXXXX.p8`, the Key ID may be filled automatically. You can edit it when necessary.
Example:
```text theme={null}
XYZ123ABC4
```
### Client ID (Services ID)
Enter your Apple **Services ID**.
Example:
```text theme={null}
com.example.app.service
```
### Team ID
Enter the 10-character **Team ID** from your Apple Developer account.
Example:
```text theme={null}
ABCD1234EF
```
After all values are entered, click **Generate**. OnSpace Cloud will generate the JWT and insert it into the **Client Secret (JWT)** field.
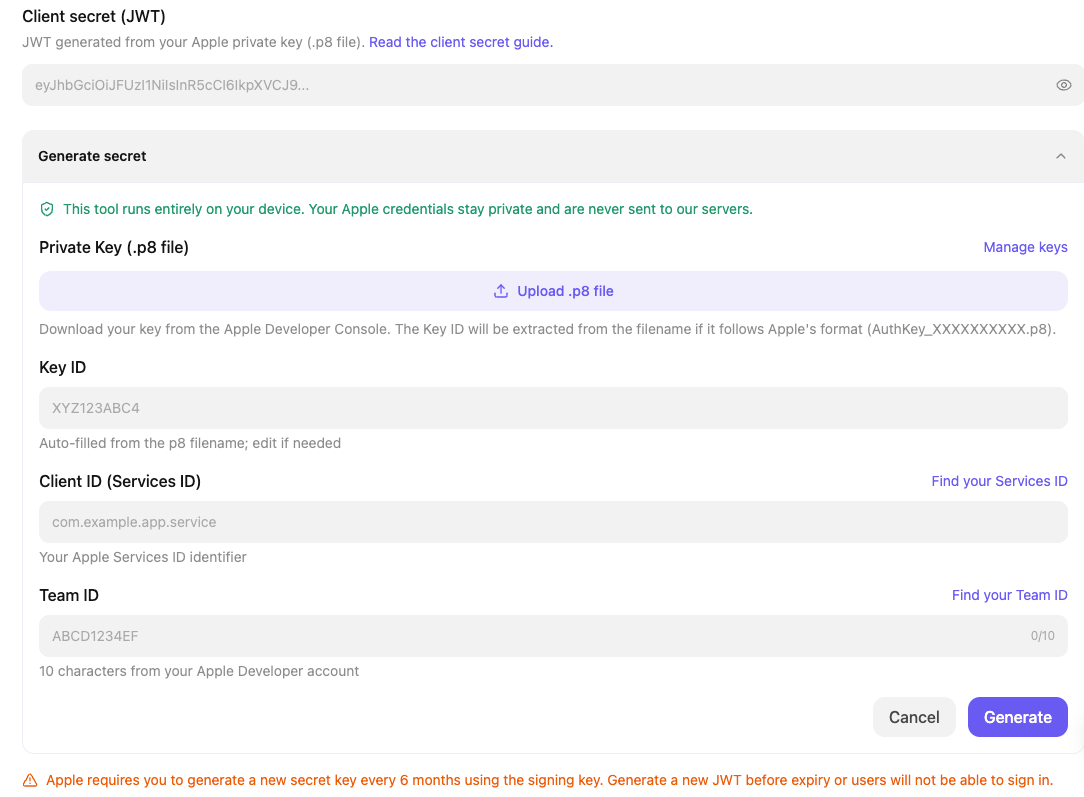 *Upload the `.p8` private key and enter the Key ID, Services ID, and Team ID, then click **Generate**.*
## Step 6: Configure email privacy behavior
You can optionally enable **Allow users without an email**.
This allows users to hide their email address when signing in with Apple. When a user chooses to hide their email, Apple may provide a private relay email address instead of the user’s personal address.
## Step 7: Add the Redirect URL to Apple Developer Console
In the **Redirect URL(s)** section, OnSpace Cloud provides the callback URL required for Apple sign-in.
Copy the URL exactly as displayed and add it to the **Return URLs** section of your Apple auth client in Apple Developer Console.
*Upload the `.p8` private key and enter the Key ID, Services ID, and Team ID, then click **Generate**.*
## Step 6: Configure email privacy behavior
You can optionally enable **Allow users without an email**.
This allows users to hide their email address when signing in with Apple. When a user chooses to hide their email, Apple may provide a private relay email address instead of the user’s personal address.
## Step 7: Add the Redirect URL to Apple Developer Console
In the **Redirect URL(s)** section, OnSpace Cloud provides the callback URL required for Apple sign-in.
Copy the URL exactly as displayed and add it to the **Return URLs** section of your Apple auth client in Apple Developer Console.
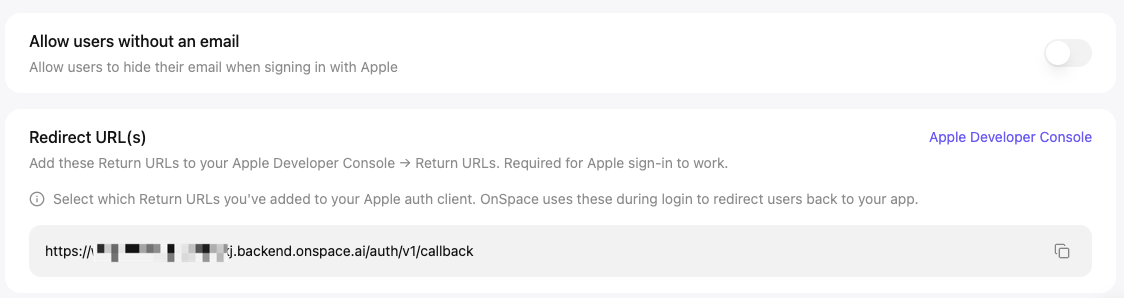 *Copy the Redirect URL exactly as shown and add it to Apple Developer Console under **Return URLs**.*
> Do not modify the URL. Differences such as a missing protocol, an extra slash, or a different domain can cause Apple sign-in to fail.
## Step 8: Save and test Apple sign-in
After completing the configuration, test the full sign-in flow.
Confirm that:
* Apple sign-in remains enabled.
* The Sign in with Apple button appears in your app or website.
* Selecting the button opens Apple’s authentication flow.
* A new user can sign in successfully.
* A returning user can sign in with the same Apple account.
* Apple redirects the user back to the correct app or website.
Whenever possible, test using a published website or installed app build rather than relying only on the preview environment.
## Common Issues
### Invalid Client ID
Make sure the Client ID exactly matches the Services ID or Bundle ID configured in Apple Developer Console.
### Invalid or expired Client Secret
Generate a new JWT and verify the following values:
* Private Key (`.p8`)
* Key ID
* Client ID (Services ID)
* Team ID
### Redirect URL mismatch
Make sure the Redirect URL displayed by OnSpace Cloud exactly matches the Return URL configured in Apple Developer Console.
### Lost `.p8` file
Apple private keys can normally be downloaded only once. If the file is lost, create a new Sign in with Apple key in Apple Developer Console, then generate a new Client Secret in OnSpace Cloud.
## Security Notes
* Keep your `.p8` private key secure.
* Never expose Apple credentials in frontend code.
* Do not share your Client Secret publicly.
* Generate a new JWT before the existing one expires.
## Configuration Checklist
* Opened **Cloud → Users → Auth → Apple**
* Enabled **Apple sign-in**
* Selected **Your own credentials**
* Entered the Client ID
* Added or generated the Client Secret (JWT)
* Uploaded the correct `.p8` private key
* Entered the Key ID, Services ID, and Team ID
* Added the OnSpace Redirect URL to Apple Developer Console
* Tested new-user and returning-user sign-in
*Copy the Redirect URL exactly as shown and add it to Apple Developer Console under **Return URLs**.*
> Do not modify the URL. Differences such as a missing protocol, an extra slash, or a different domain can cause Apple sign-in to fail.
## Step 8: Save and test Apple sign-in
After completing the configuration, test the full sign-in flow.
Confirm that:
* Apple sign-in remains enabled.
* The Sign in with Apple button appears in your app or website.
* Selecting the button opens Apple’s authentication flow.
* A new user can sign in successfully.
* A returning user can sign in with the same Apple account.
* Apple redirects the user back to the correct app or website.
Whenever possible, test using a published website or installed app build rather than relying only on the preview environment.
## Common Issues
### Invalid Client ID
Make sure the Client ID exactly matches the Services ID or Bundle ID configured in Apple Developer Console.
### Invalid or expired Client Secret
Generate a new JWT and verify the following values:
* Private Key (`.p8`)
* Key ID
* Client ID (Services ID)
* Team ID
### Redirect URL mismatch
Make sure the Redirect URL displayed by OnSpace Cloud exactly matches the Return URL configured in Apple Developer Console.
### Lost `.p8` file
Apple private keys can normally be downloaded only once. If the file is lost, create a new Sign in with Apple key in Apple Developer Console, then generate a new Client Secret in OnSpace Cloud.
## Security Notes
* Keep your `.p8` private key secure.
* Never expose Apple credentials in frontend code.
* Do not share your Client Secret publicly.
* Generate a new JWT before the existing one expires.
## Configuration Checklist
* Opened **Cloud → Users → Auth → Apple**
* Enabled **Apple sign-in**
* Selected **Your own credentials**
* Entered the Client ID
* Added or generated the Client Secret (JWT)
* Uploaded the correct `.p8` private key
* Entered the Key ID, Services ID, and Team ID
* Added the OnSpace Redirect URL to Apple Developer Console
* Tested new-user and returning-user sign-in